Merry & Bright Holiday Home Tour-Part 2

Holiday Barcart-6

Welcome to part 2 of the Merry & Bright Holiday Home Tour.  It has been such fun to partner with my 8 fellow bloggers to bring you lots of holiday inspiration.

If you’re coming over from Love Your Abode thanks for stopping in and if you’re one of my regular readers, thanks for your continued love and support!  Did you see all the amazing details in Yuni’s decor this week?!  WOW, I didn’t think she could top last week but she sure did.

This week on the tour we’re focusing on our entertaining spaces and how we celebrate the season.  Entertaining is such a joy and this year will be extra special since my brother now lives in Atlanta and my mom is coming for Christmas.

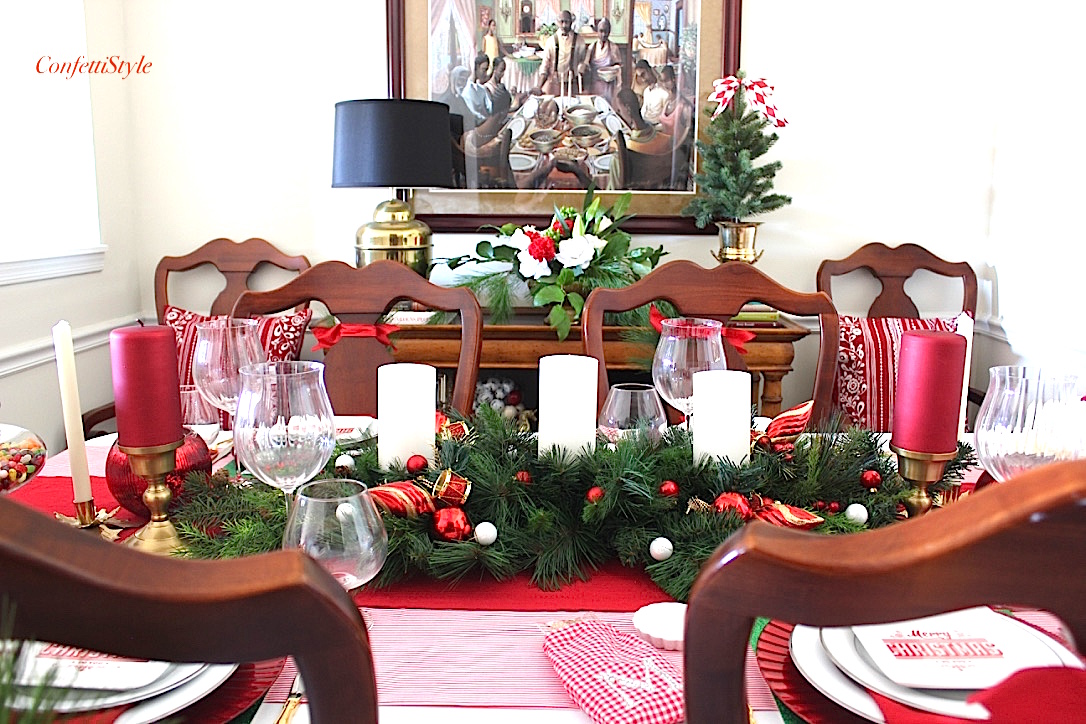
When I think of holiday entertaining I think of family dinners at a beautiful table so I got a jump on things and set my table for a Merry & Bright Christmas dinner.  Playing off the color theme from my Christmas tree decor, I created a classic red & white tablescape with a few fun touches.

Merry & Bright Tablescape-2

***One of the special touches to my table are these DIY placemats I made featuring a Merry & Bright printable art piece from Christina’s Etsy shop,  My Love Note Designs! I’ll be sharing the how-to and more details on the placemats tomorrow so stay tuned.

Merry & Bright Tablescape-6

I wanted a lush looking centerpiece so I used a greenery candleholder in the center of the table. To dress it up, I added mini ornaments and decorative ornament sprays.

Merry & Bright Tablescape-4

And to add layers to the table, I used three different linen pieces—a white tablecloth, a wide red and white stripe runner (made from simple cotton fabric) and a solid red runner from HomeGoods.

Merry & Bright Tablescape-19

I hung a wreath on the mirror and added the metal Noel sign in the middle.  I made the bow from ribbon I picked up at Michaels.

Wreath Decor-1

Merry & Birght Tablescape-8

I layered each place setting starting with the DIY placemat, a red charger and white china.  The Merry Christmas plates are from HomeGoods.

Merry & Bright Tablescape-17

My vintage gold silverware and brass candleholders add a touch of metallic shine to the table.  The holly leaf candleholders were a flea market find–one of my favorites ever!

Merry & Bright Tablescape-13

Merry & Bright Tablescape-7

These cute red and white check bags came from the dollar spot at Target and I’ll be filling them with small gifts/treats for everyone at the table. (p.s. I added the rhinestone M sticker to personalize it)

Merry & Bright Tablescape-6

thumb_IMG_1007_1024

So the console table on the back wall wouldn’t feel left out, I  created a beautiful flower arrangement using a mix of fresh and faux flowers and greenery.  More on how I made the arrangement later in the week.

Christmas Flowers

Merry & Bright Tablescape-19

Another special touch at the table are the chair cones I tied to the back of each chair.  I’ve had these metal cones for years and this year I filled them with a cedar spray, a piece of garland and mini ornaments.

Holiday Chair Accent

Christmas Cake

Entertaining at our house also involves a cocktail bar so I added a few holiday touches to our gold bar cart.

Holiday Barcart by ConfettiStyle

The Merry & Bright wall plaque is from Kirklands. I saw it online and had to pull some strings to get my hands on one.  I added the cedar sprays, bow and ornament clusters to make it just a bit more Merry & Bright.

Holiday Barcart-6

Holiday Barcart-7

And because no holiday is complete without hot chocolate, I snapped this last night as I was addressing my DIY Christmas cards.

Christmas by ConfettiStyle

Here’s another glimpse of my tree.  I made a few changes to it since last week and replaced the chalkboard I had over the table with this mirror I had stashed in the garage.  I just love this entire vignette.

And you see that cart next to the table with wrapping paper in it?  I’ll be sharing that little project on Saturday. So fun and easy!

Christmas Tree Setting--2015

I hope you’re enjoying the Merry & Bright Holiday Home Tour.  The fun doesn’t stop here…the next stop is OMG Lifestyle Blog. You’re going to love what Elaine has to share this week and if you missed her decor from last week, you can check it out here.

And you definitely want to check out all the other bloggers on the tour…

Confetti Style (yours truly)

OMG Lifestyle

Design Asylum Blog

Refresh Restyle 

Chic on a Shoestring Decorating

Positively Southern 

Amy Howard Social

M. Jones Style

Love Your Abode

Merry and Bright FINAL

I’ll be back next Wednesday, with part 3 and the tour finale.  We’ve got more holiday decor to share and I’ll be doing a wrap up of my Merry & Bright Holiday Home!

You can see part 1 of my tour here.

Shelly

The Easiest DIY Christmas Cards Ever!

DIY Christmas Card Detail

So remember when I told you weeks ago that I was going to make my Christmas cards?  Well, I didn’t tell you a fib.

When I lived in Seattle I always made my Christmas cards by hand.  One year I made cards out of 3-dimensional ornaments and another year I made my cards inside metal tins which served as the envelope.  Back then I started working on my cards months in advance of Christmas and spent lots of time making sure every detail was unique and special.

Fast forward to today.  Yes, I still love to make my cards by hand but I never seem to have time or energy on my side.  So when it came to my Christmas cards this year, I used my creativity to come up with a super easy and simple card design that took less than 10 minutes to create.

Read the Post

Gift Wrap Inspiration: Flowers and Denim

IMG_0373

Hello friends and Happy Monday!  Sorry for the last blog post today.  I had a morning meeting and then had to get a few things checked off the to-do list so I’m late getting this post out.  Anyway as the saying goes, ‘better late than never” so here I am with some gift wrap inspiration for you.

IMG_0371

Whenever I’m looking for a new idea to inspire a gift wrap project, I usually don’t have to look far.  The inspiration for this wrapping came from some flowers I spotted while on an evening walk recently and a denim shirt I had in my closet. This package is headed to a girlfriend and I just know she’s going to love the wrap.

IMG_0363

The box I used for this package is a two-piece box with separate lid and I wrapped each piece in the beautiful floral paper I picked up in the dollar ($1.50) section at #Michaels.  Then I added a denim heart, also from Michaels and adhered it with tape around the edges so it could serve as a pocket.

{p.s.  my local Michaels just restocked the dollar area and there are lots of really cute fall and Christmas items you should check out
{p.s.s.  the denim hearts are on clearance at 80% off and they have denim pockets too}
IMG_0364

The finishing touches are a pink gift tag with hand lettering and a silk bow and flower that are clipped onto the edge of the heart using a small clothespin.

ribbon from May Arts

IMG_0372

IMG_0373


IMG_0368

Wrapping gifts is always fun but when you can create a beautiful box using just a few items and in less than 10 minutes it’s even better.

I hope you give this gift wrap idea a try.  If you can’t find denim pieces at your craft store, you can always cut up old clothing that is slated for the thrift store.

Happy wrapping!

Shelly

sharing on:

That-DIY-Party-autumn


All Wrapped Up For Christmas

Christmas Gift Wrap 2014 by ConfettiStyle (1) copy

T-minus 5 days and counting until Christmas. 

The Christmas shopping is all done and boxes have been shipped.  Things are starting to settle down around here and that has given me a chance to get most of my holiday gifts wrapped.

I love wrapping gifts and it was so much fun this year to coordinate my gift wrap with my holiday tartan plaid theme.

Here’s a look at my 2014 Holiday Gift Wrap and a few tips that will help you put the finishing touches on your own gifts.

Read the Post

Organizing Around the House and the Pre-Storm Madness

Hi there,
If you’ve watched the news today you know that all of us here in Georgia are bracing for what they say is going to be a pretty bad ice storm. Given the events the unfolded two weeks ago Atlanta is not taking any chances. They have already cancelled school for Tuesday and Wednesday and are considering the rest of the week.

I think just about everyone in Atlanta hit the grocery stores today because it was sheer madness. I’m not talking just the milk and bread aisles being empty, the produce department was wiped out and there must have been 30 people in line at the deli counter.

IMG_5059

Not a single banana to be had.  Thank goodness I don’t have a pet monkey.

IMG_5058

Not blueberries or blackberries which means no smoothie for me.

IMG_5060

Most of the salad section was cleaned out. I guess everyone is planning on eating healthy while they are stuck at home.

I survived the grocery store and even snagged some salad.  Oh, I also by-passed the deli line by ordering a deli sandwich and then asking the clerk to slice an additional 1/2 lb. of turkey for me while she was at it.  Genius on my part!

On to bigger and better things. 

I mentioned last week that several areas of my home were in bad need of organizing.  The level of disarray is not normal for me, but I’ve slacked in the organizational arena and am going to blame it on having the flu.

The most time-consuming part of this project was purging and getting rid of unneeded things, especially in the bathroom.

Our small linen closet started out as this mess…

IMG_5045

Apparently I have a cosmetic and personal care hoarding problems I wasn’t aware of.  And yes, I have every gift-with purchase bag ever made from Clinic.

IMG_5061

Within a couple of hours it looked like this!

IMG_5069

$2.00 photo boxes from Michael’s make great storage boxes

Nice labels for the plastic bins

Baskets to add a little style

IMG_5071

IMG_5064
Cleaning products all together and easy to reach

IMG_5074

The broom (from HomeGoods) is hung on the wall with a Command Hook

IMG_5068

 I added a over-the-door shoe holder from TJMaxx to hold items we use regularly {like cold and flu medicine}:)

Another area I tackled was some of my craft storage.  My washi tape collection has grown and was overflowing…

IMG_5048

A clear silverware caddy from HomeGoods solved that problem.  I love that I can see all my tapes and access what I need without disturbing the other rolls.

IMG_5055

My basket of ribbon rolls (sorry no before photo) now looks like this (x two).  I told you I have lots of ribbon.

IMG_5077

IMG_5075

These kitchen pantry door racks from the Container Store are ideal for holding ribbon rolls.

So glad I got these projects crossed off my to-do list and can move on to more exciting things like cleaning out my kitchen cabinets.  Ugh!

Shelly

Copyright © 2024 · Theme by 17th Avenue

Copyright © 2024 · Amelia on Genesis Framework · WordPress · Log in