Design Chat: Small Living Room Design Plan


Hi friends.  You might have noticed that it’s been pretty quiet around the blog lately.  I was at the Atlanta Gift and Furniture show all last week and the blog took a back seat to work.

I’m back and have a new Design Chat post for you today.  If you’re not familiar with my Design Chat series, it’s where I help one of my readers with a design challenge they are facing.  Today, I’m helping Ulochi with a decor plan for her living room.

Here’s the message that Ulochi sent me…

Hello, I bought a remodeled mid-century ranch and with these old homes, the layouts can be “interesting”. For instance, the living room is driving me nuts. Its rectangular and small, with a picture window. Even the TV placement is a hassle.  I want to add plants or standing art but I have to fool-proof it from my 8 month old daughter. The home has an ‘urban farmhouse’  feel with elements like barn doors and shutters. I bought a tufted gray large sectional and it makes me want to do something romantic and cozy.  I can’t seem to find a way to design this space and make it feel like home. Please help.

Here’s a photo of the living room, facing the front door…

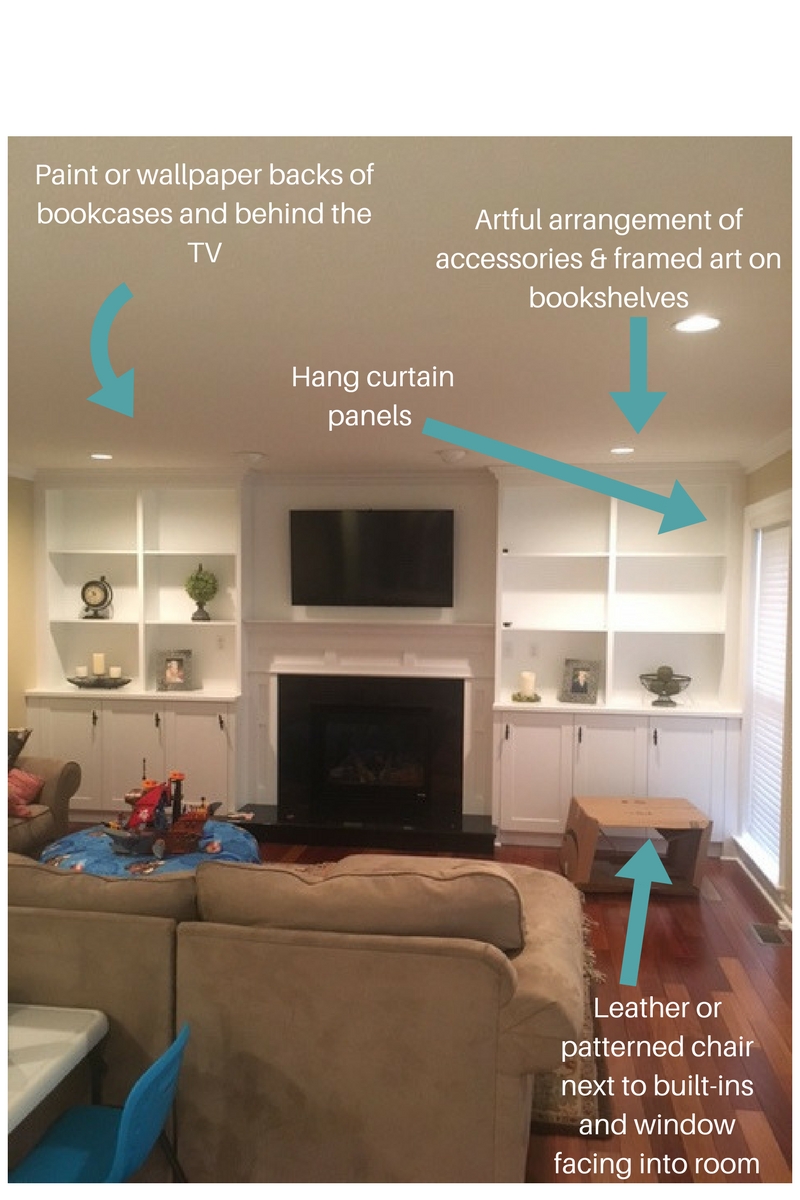
and a couple of different angles looking into the room...

and a view of the wall space that anchors the sofa.

Decorating small rooms can definitely be challenging so before I share my design suggestions for Ulochi’s living room, here are a few tips for small space decorating.

SMALL SPACE DECORATING TIPS:

  1. Don’t be afraid to use larger scale furniture in a small space.  Larger furniture will actually make the room feel bigger than it is.  With that said, do pay attention to how furniture would fit in a room and it might impact the traffic flow in and out of a space.
  2. Small spaces often times lack much architectural or visual detail so create your own by painting one wall in an accent color.  The furthest wall in the room is a good option because it will draw the eye into the space and actually make the visually recede, creating more depth.
  3. Hang curtains on the wall with the rod as high as possible to make the ceiling appear taller.
  4. Add decorating elements in the room that create visual height and width like bookcases and artwork.  And when selecting artwork, don’t shy away for large pieces will can create a focal point within the room.
  5. Create an interesting accessory mix so the eye has lots of pretty things to look at around the room, taking the focus off of the size of the room.
  6. Make sure there is sufficient lighting in the room.  Lighting enhances a space and there should be multiple lighting options within a room.

Ok, here’s one more look at Ulochi’s living room…


Design Plan:

The room really needs some finishing touches to create the romantic and cozy vibe the Ulochi wants. The first thing I could recommend is painting the back wall in a soft aqua color like Benjamin Moore Heavenly Blue. The color will work great with the grey sofa and keeps the room feeling light and airy.

Then I’d add a few accent furniture pieces and decor to bring the room to life.  All of the pieces I’m recommending for this space are from Wayfair, Target and Pier One  and this entire look is less than $900.

Design Plan Details:

  •  Sawhorse Ladder Bookcase from Wayfair–leaning bookshelves are a good space-saving option that still provides for storage and display space.  Ulochi can place plants on the higher shelves so they will be out of the reach of her daughter.  The lower shelves can be use to decorative accessories and books.  And a basket on the bottom shelf will provide concealed storage and add texture to the room.
  • A round coffee table like this Carolyn Coffee Table from Wayfair will help to visually break up all of the rectangular shapes in the room and anchor the sectional. A round coffee table also makes it easier to move around the seating area in a small room.
  • The Dmitry End Table, also from Wayfair will anchor one side of the sofa and provide an additional surface for someone to use.  I recommend a light grey finish to provide visual contrast to the stained wood floors and furniture.
  • Right now the only light source in the room is the overhead ceiling light.  The Adesso Hamilton Floor Lamp placed behind the end table will provide additional lighting and add an element of visual height.
  • The wall opposite the window is an ideal spot for a piece of artwork.  The goal would be to create visual impact and that can be done with one larger piece of art or a grouping that reads as one statement. With the fabric and furniture colors, I think the Watercolor Poppy 1 art from Wayfair would be dynamic.  This piece is available in several sizes and also had a coordinating mate if someone wanted two pieces of art.
  • The finishing touch beyond accessories would be pillows.  Pier 1 has a great selection of pillows to fit the color story I’m building.  I choose the Textured Striped Mineral Pillow along with the Luxe Velvet Mineral Blue pillow for the sofa. Pairing a solid and stripe are a great balance with the floral art.

When it comes to shopping for accessories, there are so many some great options for budget friendly decor.  In addition to Pier 1, Wayfair and Target, here are a few of my favorite stores to shop for decor:

ACCESSORY RESOURCE LIST:

  • Kirkland’s has lots of options that will fit a farm-house decor theme and it’s also a great resource for artwork and bookcase accessories.
  • HomeGoods is a given when shopping for bookcase decor.  I love their selection of trays, vases and decorative objects.  And it always pays off to take a stroll through the pillow aisle.
  • I recently discovered that At Home has a great pillow department.  Even though lots of their pillows don’t have down inserts, many of the cases have zip closures so it’s easy to change the insert out.  I also like their selection of inexpensive accessories.


Ulochi has a great foundation started for her living room and with a few additional pieces and some accessorizing, she’ll have the home of her dreams.


New House Tour | Before Paint and Pretties

Hi friends.  I’m excited to give you a look into our new house.

(all of these photos were taken with my phone so they are not the best–sorry)

As I mentioned last week, we purchased a three-story townhouse just north of Atlanta in  Peachtree Corners.

We haven’t spent a ton of time in the community yet but we can tell already that we are going to like it.  Everyone waves as they drive by and few of our neighbors have already stopped by to introduce themselves.

Most of the changes we are making in the house are cosmetic.  In addition to having the entire interior painted, we are changing out all of the lighting and ceiling fans.  We’re also replacing the carpeting and having the kitchen cabinets painted.


When it came to picking paint colors, I decided to keep the color palette neutral.  We’re using just three colors throughout the entire house so I’ll have lots of flexibility with decor and accessories.

I choose my go-to white, Simply White by Benjamin Moore ( OC-117) for the main floor walls and trim.  The current wall color is white but the color is creamier than I want.  BM Whisper (CSP-500) will be used in the bedrooms and BM Black Satin (2131-10) will be used on the doors and stairs.The painters started painting Monday so the transformations are underway.

This is the first time that I’ve ever used the color Whisper and I have to tell you I love it.  I stopped by the house yesterday and the color is so beautiful in the master.  It’s a soft grey with a tiny hint of taupe in it.  In natural light it reads light grey and in the evening it takes on a slightly darker feel.

I’ll share all of my design plans with you as I flush them out but we’re taking our time with decorating so things will be in constant flux.

So while the paint is drying, let me take you on a tour.

NEW HOUSE TOUR–A LOOK INSIDE

The lower level of the townhouse is off the garage.  There’s a large bedroom and full bath on that level as well as an entrance area.

I’ll be using the lower bedroom as my office/studio space. I’m so excited because I won’t have to lug fabric books and all my design paraphernalia and up stairs anymore.

I haven’t decided if I’m going to do carpet or hardwoods on this lower level yet but we’re leaning towards hardwood.

From the lower level you go up a flight of stairs to the main floor where the living room, dining area and kitchen are located. At the top of the stairs you can go down the stairs to the front door.

The main floor is open concept so all the areas flow together.  We love how large and open the space is. And I love the picture molding detail on the walls.

The floors on the main level are Brazilian hardwood and they are in good condition so wer’e not changing them.

The bookshelves one each side of the fireplace will be painted white.  And down the road we plan to have a mantel built.

***If anyone can give me a good reason why the builder didn’t take the bookshelves all the way up to the top I’d love to hear it.  The open space is too small you can’t even put baskets up there. #buildersdothefunniestthings

The kitchen is a nice size (especially for someone who doesn’t do a lot of cooking) and is in good shape but we’re going to make a couple of changes in this area too.  The kitchen cabinets are getting painted white and I’m having a bookcase/cabinet built to fill in under the island extension.  Since I don’t want stools at the island the bookcase will give us added storage.

I’m also planning to add a glass front cabinet on the empty wall for more storage.  This will be the perfect space for my ever-growing dinnerware collection.   I’m currently considering this piece from Wayfair.

From the main floor there’s another flight of stairs that take you to the third floor where the bedrooms are.

The master bedroom is at one end of the hall and has lots of windows and a tray ceiling.

The master bath will get a new look over time–new counters, flooring and shower.  For now I’ll be changing out the lighting and framing the mirror.

The laundry room is down the hall between the master and the guest bedroom.

The guest bedroom and bath are at the far end of the hall.  This bedroom is fairly large and just like the other rooms in the house it has large windows.  More cosmetic changes will take place in this room.

There’s not much I can do outside on the front but I do have plans for the deck off the back of the house.  We’re adding a section of fencing on the street side for more privacy and I’ll use planters with lattice along the back side for decor and privacy.

We’re excited to move in and get settled, and I’m excited to start decorating.  Managing this move while juggling cient projects is no easy task but I’m managing to get it all done with a little less sleep.

More on the house and my design plans to come….


Design Chat: Accessorizing Bookshelves and adding the finishing touches

I received an email from one of my blog reader, Megan who was looking for help with the wall decor and accessorizing the built-in bookshelves in her family room. The bookshelves and the walls have been empty for 3 years and Megan doesn’t know where to start with a decorating plan. She is also struggling with the sofa, which she’s not a fan of but others in the family are.

Here’s a look at Megan’s family room…

Design Chat--Accessorizing Bookshelves and Decorating Tips by ConfettiStyle

Design Chat--Accessorizing Bookshelves and Decorating Tips by ConfettiStyle

Design Chat--Accessorizing Bookshelves and Decorating Tips by ConfettiStyle

And here’s my design vision for Megan’s room…

THE COLOR PALETTE

******************************

The tan sofa, beige walls and white built-in shelves create a neutral color foundation for the room.  The area rug has different tones of red, browns and green in it so that should be the jumping off point for accessorizing the rest of the room.

Design Chat--Accessorizing Bookshelves and Decorating Tips by ConfettiStyle

The expanse of white shelving surrounding the TV needs a major pop of personality.  Beyond getting the right mix of accessories, I recommend that Megan either paint the backs of the bookshelves in an accent color or cover the backs with a grass cloth wallpaper.  Wallpaper would achieve two things–1) color and 2) visual texture which would really enhance the space.

When painting the backs of bookshelves, I usually recommend that you go a shade or two light or darker than your wall color.Design Chat--Accessorizing Bookshelves and Decorating Tips by ConfettiStyle

ACCESSORIZING

*****************************

When it comes to decorating bookshelves, the items you decorate with are just as important as how you arrange them. Here are a few tips on accessorizing bookshelves and a graphic with accessory groupings that always work.

  1. Create depth ‘top to bottom’ and ‘front to back’.  Arrange items so the pieces are not at the same level or position of the shelf.  Your accessories should feel layered and not uniform.
  2. Vary the size, scale and shape of your accessories.  Decorate with a variety of items to create visually interesting arrangements.  And also keep in mind that if your shelves are adjustable you can create wider openings which will allow for larger decorative pieces.
  3. Create balance from shelf to shelf and side to side.  As you arrange items, step back to make sure the overall look of each shelf and each side of the fireplace feels balanced.
For more bookcase decorating tips, read my post 5 Ways To Style Your Bookcase.

Design Chat--Accessorizing Bookshelves and Decorating Tips by ConfettiStyle

WALL DECOR & SOFA STYLING

**********************************************

Wall decor is one of the most important elements of accessorizing a room.  In many cases your wall decor will serve as the focal point for the room.  In Megan’s room, the wall decor will provide a dominate impact statement within the room so it needs to be dynamic.

I recommend a large piece of artwork flanked by starburst mirrors for the most visible wall in the family room.  A piece of art will add color and draw you in to the room.  Mirrors will add a graphic detail and enhance the light coming in from the opposite window.

To enhance the sofa, Megan should add accent pillows and a small-scale bent arm floor lamp at the end of the sectional providing much-needed task lighting.

Design Chat--Accessorizing Bookshelves and Decorating Tips by ConfettiStyle

FUNCTIONAL DECOR

*******************************

The other decorative items I’d recommend is a console table behind the sofa, an accent chair near the built-ins and curtain panels for the windows.

 A console table will visually extend the partial wall behind the sofa and create an additional surface for a lamp and accessories.

The accent chair will provide additional seating and create a more balance space, filling the now empty corner.

Curtain panels will add softness and another pattern element within the room.

Design Chat--Accessorizing Bookshelves and Decorating Tips by ConfettiStyle

THE LOOK

**********************

Unique accessories and colorful wall decor is all that is needed to bring Megan’s room to life.

Design Chat--Accessorizing Bookshelves and Decorating Tips by ConfettiStyle

Design Chat--Accessorizing Bookshelves and Decorating Tips by ConfettiStyle

Finding The Starting Point For Your Room Design

One question I get asked a lot is “where should you start when it comes to developing a room design plan ?”

If you read design magazines or books, you’ve probably read lots of different answers to this question and all of them are probably right to some degree.  Finding the starting point for your design plan really starts when you determine the end result that you want for a room.

Finding The Starting Point For Your Room Design.001

Think of decorating a room in the same way you would a road trip.  You know where and what you’re starting with and you know where you want to end up.  The steps that happen between the beginning and end point define the trip or in the case of decorating, they define your decorating plan.  And just like a road trip, you might venture off your planned route or change course all together, so know that the same thing can happen when decorating your home.  As long as you keep focused on where you want to end up, you’ll get to your design destination.

Here are a few tips to help you create your decorating journey from start to finish.

Read the Post

Copyright © 2024 · Theme by 17th Avenue

Copyright © 2024 · Amelia on Genesis Framework · WordPress · Log in